A Review of Next-Gen mSLA 3D Printing
The nearly four-decades-old story behind Charles “Chuck” Hull’s industry-changing invention has become the stuff of 3D printing legend. An engineer frustrated with the long lead times needed for plastic prototype parts, Hull looked to his work with UV light to harden resin-based tabletop coatings as a way to solve the problem, and after months of late-night tinkering, he was successful.
In 1986, Hull filed for a patent on his “Apparatus for production of three-dimensional objects by stereolithography.” His application described a machine that successively “prints” thin layers of a UV-curable material, one on top of the other, using a programmed movable beam of laser light shining on the surface of the liquid.
He went on to found 3D Systems shortly thereafter, and today, there’s little argument that the company’s commercialization of his stereolithography apparatus (SLA) altered the course of manufacturing.
Well-deserved kudos to Hull aside, traditional stereolithography suffers from a significant drawback: it’s among the slowest of all 3D printing technologies. Granted, its speed has improved dramatically over the years, and modern printers bear little resemblance to their forebearers, yet the fact remains that SLA’s use of a laser beam <100 µm (<0.0039 in.) in diameter to painstakingly trace every square inch of a printed part’s paper-thin layers is akin to filling in an entire coloring book with a very small crayon.
Yes, SLA remains far faster than machining and other traditional prototyping methods. It can also produce highly accurate parts with exceptional surface quality and very fine details. And unlike those early days, it offers users a broad array of photocurable resins, many of them suitable for demanding, end-use applications. But for higher production volumes where hundreds or even thousands of parts are nested onto a single build plate? Forget it.
We’ll discuss how 3D printer manufacturers like Nexa3D and others have addressed these high-volume production limitations in a moment, but first, it’s important to explain another SLA equipment shortcoming, although depending on the size, types, and quantities of parts you wish to print, it might instead be considered a benefit.
Size Matters
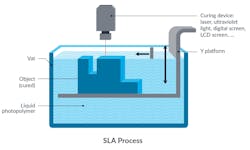
SLA machines in all their various iterations rely on the principle of vat polymerization. With traditional “top-down” designs like Hull’s, a UV-laser beam or multiple beams are directed onto the upper surface of an aquarium-like container—or vat—filled with photoreactive resin. As each layer is completed, an elevator lowers the build plate and its burgeoning workpiece by a few thousandths of an inch, and fresh resin is then drawn across its top.
This process repeats over and over again until the part is complete. Since there are few limitations on vat size or depth, this method is ideal for very large parts; some builders advertise machines big enough to prototype engine blocks and similarly-sized components.
Yet filling a large vat with resin can cost several thousand dollars or more— sometimes much more—a significant expense for many manufacturing firms and practically all hobbyists. And changeover to a different resin requires that the operator drain the tank, scrape down its sides to capture any leftover material, and thoroughly clean the elevator and all interior surfaces with isopropyl alcohol. In addition, these “industrial 3D printers” must be precisely leveled before use, as any variation from perfectly horizontal can translate into surface inaccuracies.
This is where bottom-up SLA printers come in. Nexa3D’s XiP, NXD, and NXE-series printers with their LSPc technology are a few examples. More on this shortly. As we and others have found, an inverted printer design eliminates the need for supersized tanks by using a transparent membrane or window positioned on the vat’s underside.
Here, UV light is aimed upwards, through the membrane, and onto the bottom of the workpiece. As each layer cures, the elevator lifts the build plate slightly, allowing the resin to flow or be drawn into the void; the elevator then drops to a position one layer thickness higher than it was previously, the light shines again, and the process repeats until part completion.
The beauty of this configuration is that relatively little resin is required—aside from that needed to build the workpiece, it’s only necessary to keep the membrane-covered. And since the elevator and other moving parts are now positioned overhead and out of the resin vat (on most systems, anyway), maintenance is generally much faster and easier than with top-down SLA machines. So is switching to a different resin.
In fact, systems from Nexa3D and a few other 3D printer manufacturers allow the operator to simply swap out one reservoir for another and then use it as the storage container. Concerns over machine leveling are eliminated, as is the cost of filling a humungous resin vat.
Hydraulic Hijinks
And yet, challenges remain. All SLA machines, Nexa3D’s included, exert hydraulic forces on the workpiece that can lead to part distortion, intralayer separation, and even so-called crashed builds. On top-down machines, the culprit is the scraper blade as it drags viscous resin over the partially cured part below, while bottom-up machines are more prone to “peel forces” when the build platform lifts slightly between layers.
It’s possible to mitigate these adverse effects to some extent through part orientation techniques and beefing up of support structures in critical areas, but the fact remains that bottom-up desktop machines are more likely to see layer delamination due to peeling, especially where large, flat surfaces are concerned.
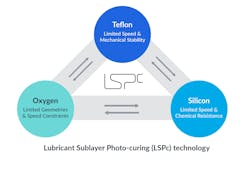
What’s needed in this situation is a membrane that’s A) lubricious, so the resin is less inclined to stick to it, and B) somewhat flexible, allowing the membrane to deflect slightly in the face of upward pressure and more easily peel away from the part—think of trying to remove a stubborn Band-Aid from a week-old cut. Some builders have turned to transparent. Teflon or silicone for their membranes, and while both are quite slippery, they are also imperfect solutions.
Teflon, for example, is not only overly rigid but is very sensitive to debris and mishandling that might puncture it. On the other hand, silicone offers poor chemical resistance, is attacked by the resin, and tends to swell over time. A third option is to pump oxygen through a permeable membrane, creating a “dead zone” that inhibits curing and reportedly keeps the resin from sticking. But as many users have found, oxygen flow limitations make it challenging to create large workpieces, requiring the user to make geometry modifications and pay special attention to part orientation during the build.
This is why Nexa3D has taken a different path. As the name implies, its Lubricant Sublayer Photo-curing (LSPc) technology utilizes a proprietary membrane that’s inert like Teflon, flexible like silicone, and does not depend on oxygen flow for its lubricity. It provides a best-of-all-worlds solution that supports extremely fast build speeds.
Let There Be Light
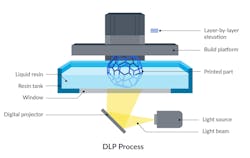
That leads us to the final piece of the SLA productivity puzzle, after which we’ll lay out some pros and cons of each to give 3D printer buyers some food for thought. Where some inverted SLA printer designs continue to rely on the laser-based rastering approach used by their top-down legacy counterparts, most have turned to much faster methods of resin curing. The first of these is digital light processing (DLP), which uses a light source and optical arrangement similar to that found in a home theater projector to flash an entire layer image at once onto the membrane, curing the resin on the other side in an instant.
As one might imagine, these systems are far faster than ones that trace each layer, but they do suffer from a few key deficiencies. The first is optical uniformity. If you’ve ever watched a movie on a home theatre system, you may have noticed that the edges of the screen are blurry while the middle area is more in focus. Projector manufacturers compensate for this by trimming the image to fit and then using software to correct for any optical aberrations. DLP printer providers take a similar approach.
The second deficiency is power capacity. Because the image-producing chip sits at the center of the projector’s optical stack, the amount of UV light that can be pushed through it (and therefore the printer’s build speed) is limited. Exceed this throughput level and you risk damaging the electronics.
Lastly, the glory days of DLP are gone. Its inventor, Texas Instruments, is the sole manufacturer of DLP chips and has taken extensive measures to maintain ownership of the technology, limiting the acceleration of development naturally associated with a competitive market.
As such, the market has pivoted towards lower-cost LCD and LED technology, and the high-resolution DLP systems needed for 3D printing—particularly of larger parts—are therefore quite expensive, especially when one considers their lower performance levels.
Enter mSLA.
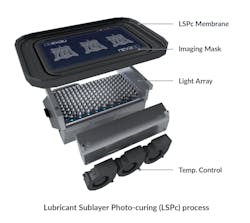
The “m” stands for masked. It uses an LED (light-emitting diode) array as the light source together with an LCD (liquid crystal diode) photomask, which serves to shape the layer image as it passes onto and through the membrane. This arrangement allows higher light levels (which, as a rule, translates to faster build speeds) with less image distortion (a.k.a. better parts). And because crucial LED and LCD components are less expensive than their DLP equivalent, mSLA systems are generally more affordable.
Here again, questions over usable power, heat dissipation, image homogeneity, part quality, consistency, and system cost are all relevant to anyone shopping for an SLA-type 3D printer, yet it’s clear that LCD/LED technology will continue to improve, and is therefore squarely in the mSLA driver’s seat.
Checking the Boxes
For Nexa3D’s implementation of mSLA technology with our proprietary LSPc process, we conducted extensive computer simulations followed by real-world testing to address each of these concerns. The result is an open architecture, reflector-based light engine.
It’s equipped with a 200-diode LED array for maximum light generation, a 13-inch 4K high-resolution LCD mask sitting between the membrane and LEDs, and a duct and blower design that efficiently cools the projector area. This provides the fastest printer on the market with the largest build area in its class without sacrificing image quality, using affordable, long-lasting, and readily available components.
There’s more to achieving higher 3D printing productivity than the printer, though. Resins suitable for the end-use application must be carefully selected. Robust print preparation and workflow management software are crucial. Efficient post-process curing and washing equipment streamline downstream processes.
Each of these plays an essential role in throughput and part quality, as does the support you receive from your equipment supplier. Nexa3D has checked each of these boxes, which is why we’re comfortable making our claim of 20X productivity gains.
For instance, a number of equipment providers in this space have attempted to increase speeds by bombarding the print area with UV light, suggesting that more photons equal shorter cure times. And while that’s true to some extent, the problem is excess heat, the enemy of part accuracy and structural integrity. Others have tried to avoid this by keeping UV light levels the same but adding photo initiators to the resin, thus making it more photoreactive and therefore faster curing.
Here again, this leads to a runaway thermal reaction that creates excess heat and jeopardizes part integrity. Nexa3D, on the other hand, eliminates heat-related problems with the air-cooled, open architecture design mentioned earlier, as well as a slightly larger vat that helps to mitigate any heat buildup. The result? Faster builds and improved part quality.
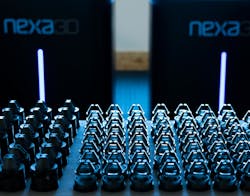
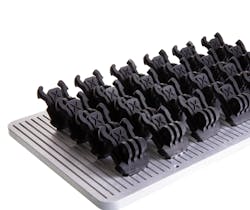
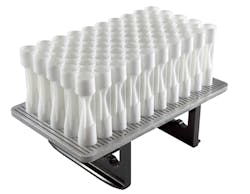
There’s also the time needed for resin replenishment between print layers. Lift the elevator too quickly on most systems and you’ll end up with layer separation— on very tall or large parts, downward pull forces can even cause a crashed build. Due to the use of a highly lubricious Everlast membrane, however, LSPc supports much faster resin replenishment cycles, which in turn shortens build times significantly—in one well-known example, LSPc was able to print 50 venturi tubes measuring 11 centimeters high in less than 30 minutes, a job that would have taken many hours otherwise.
Conclusion
We’ll discuss build preparation, additive workflows, post-processing, and all the other components of 20X faster 3D printing in a separate article, but it’s important to note one final paradigm shift made possible by LSPc technology.
Instead of waiting until the next morning or even a few days to build a platform full of parts, what if you could do so in 20 or 30 minutes? Suddenly, you can start your day with half a dozen different designs in mind and end the day with those prototypes on your table.
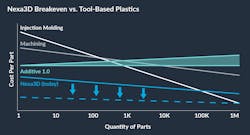
You can also think about populating your build plate with hundreds or perhaps tens of thousands of parts and printing them quickly enough to compete with CNC machining and injection molding processes, but without the tooling, long lead times, and design constraints that come with these traditional manufacturing methods. What would that do to your business model?
