How Measurement Sensors Improve Tooling Machines
In many cases, improvements to machine tools can only be achieved using sophisticated sensor technologies. Micro-Epsilon demonstrates this with a wide range of applications that are ideally suited to the machine tool industry.
Monitoring the thermal expansion of spindles
The industry for high precision machine tools has been experiencing a genuine boom in the last few years. These tools produce workpieces whose accuracy is often in the micrometer range.
Achieving these accuracies requires the optimization of machine tool designs in many areas. One of the most critical components is the spindle. High speeds and the friction between the tool and the workpiece can lead to heating up of the spindle and a change in its length. Liquid spindle cooling can limit this effect but cannot entirely compensate for it. In addition to the temperature effect, the length can change due to high centrifugal forces that occur with rapidly rotating spindles.
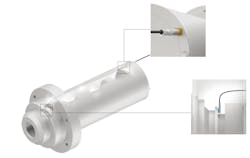
In order to achieve very high accuracies during the finishing of the workpiece, the change in length of the spindle must be detected by a sensor. The CNC control system can then adjust the position of the tool based on the measured values. For this application, Micro-Epsilon offers the SGS 4701 (Spindle Growth System) measuring system, which the company developed specifically for use in high-frequency spindles. The system is based on inductive sensors of the eddyNCDT series, which measure on a non-contact, wear-free eddy current basis. This measuring method, which can be calibrated to ferromagnetic and non-ferromagnetic materials, is insensitive to heat, dust, and oil.
The system design including the miniature sensor, sensor cable, and compact controller, allows the design engineer to integrate all components into the spindle. The sensor is installed in the spindle in most applications so that it can measure the change in length of the labyrinth ring of the spindle.
The controller can either be mounted on the spindle housing via a flange or integrated directly into the spindle. The sensor system measures the length expansion and additionally the temperature and outputs these values to the controller. The resolution of the length measurement is 0.5 μm, which enables high precision manufacturing.
Measuring the clamping position
Another critical component of a machine tool is the tool clamping system. Modern machining centers can normally change tools automatically and thus ensure high productivity levels that are required in many manufacturing environments. In a magazine, various tools are each mounted in a tool holder. When changing the tools, the machine automatically removes the appropriate tool holder and places it on the spindle whose clamping system locks the tool holder in position. The perfect function of the clamping system on the spindle is extremely important. If the tool is incorrectly positioned, this can lead to faulty processing that incurs high costs. If the tool is tilted, the worst-case scenario is that it can loosen due to the high speeds and the associated forces, resulting in high damage caused by collisions with other machine tool components.
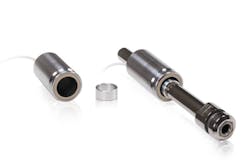
Often, initiators and switching rings are used to monitor the clamping position. However, these are difficult to adjust. The analog induSENSOR LVP sensors from Micro-Epsilon offer a much simpler constructive solution. The cylindrical sensor can be easily integrated into the release device of the clamping system. A ring, which serves as a target for the sensor, is simply glued onto the drawbar. The measuring principle of the sensor is non-contact and so is not subject to wear. Since the sensor provides an analog signal that is proportional to the stroke of the drawbar, this solution enables continuous monitoring. The tedious setting of the switching point, which is necessary for other solutions, is completely eliminated here. Even with this sensor, the sensor electronics are very small and can, therefore, be integrated directly on site.
Tailstock position measurement
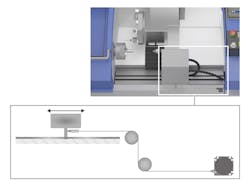
Another common measurement task in machine tools is determining the position of the tailstock. Although this measurement has no direct impact on the precision or safety of the machine, it poses many challenges for design engineers. Thus, the position of the center point of the tailstock often has to be determined over a very large area up to a few meters. To make matters worse, the space for the corresponding measuring system is limited. An ideal and also cost-effective solution is offered by Micro-Epsilon with its wireSENSOR draw-wire sensors. Due to their compact design, these sensors can be easily mounted even in confined spaces. The sensor does not have to be installed directly in the vicinity of the tailstock, as the measuring rope can be guided very flexibly over different pulleys. Typical sensor models for machine tools offer measuring ranges from 300 mm to 2,100 mm, although larger ranges are also available. The sensors are extremely robust and very durable even under difficult environmental conditions, such as those that prevail in a machine tool.
Solutions for different measurement tasks from a single source
With Micro-Epsilon sensors, the machine builder has the opportunity to implement all measurement tasks with solutions from a single source. In addition to the tasks described above, other measurement tasks can also be solved using products from the sensor specialist. For example, the optoNCDT laser sensor can precisely check the position of the tool holders in the magazine. Fast and precise position determination is often required during the set up of the machine tool.
Micro-Epsilon sensors have common interfaces that allow them to be easily connected with the CNC controller. They are of very high quality so that the reliability of the machine tool and thus their productivity is ensured. The miniature design of most sensors allows them to be optimally integrated into the machine without the need for any costly design changes.


